Thursday, April 4, 2013

Make a Bouncing Polymer Ball

Make a Bouncing Polymer Ball by Anne Marie Helmenstine, Ph.D.


Who doesn't love a bouncy ball?  As a kid, and even into adulthood, I love these things.  When I saw that I could make my own!! Save money!! Impress my son!! Game on, let's do it.  I couldn't wait.  How much fun this would be as something that my son and I could do to give as gifts.

Wrong.

This recipe for making a Polymer Bouncing Ball was one big flopping disappointment.  As far as the picture, in the upper left, is concerned, mine didn't come any where near to looking like that!

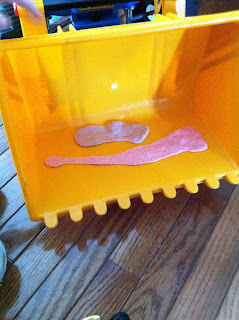
Let's just say, there is always room for error when working with an experiment.  So, that said, if anyone else tried this and had success, please comment and let me know.  Especially, if you were able to replicate the picture at the top.  Because, the picture, below this paragraph, is what mine looked like.  We made several different colors.  None of them turned out like the picture above advertises them to.

As you can see, from the picture below, they could be stretched.  They did not hold their shape, at all.  


Despite the failure to replicate the picture, my son did love this, and he did have fun, and they do bounce.  They just have to be thrown, with a good amount of force.  The "ball" will bounce once, but because it flattens upon impact, it will not bounce again.  My son played with these all day, and for days, until, they ultimately dried up and became useless.  

I left some out to dry, thinking maybe they just needed to harden up a bit.  This rendered them into a hard, ball of nothing.  We put the dried up ones, in File 13.  The others, were kept in a zip lock baggy to keep them from drying out so quickly. 

Pinterest Pin Test Rating: Pintiful


List of supplies needed: 

Bouncing Polymer Ball Materials
Here's a list of materials you need to gather to make bouncing polymer balls:
  • borax (found in the laundry section of the store)
  • cornstarch (found in the baking section of the store)
  • white glue (e.g., Elmer's glue - makes an opaque ball) or blue or clear school glue (makes a translucent ball)
  • warm water
  • food coloring (optional)
  • measuring spoons
  • spoon or craft stick to stir the mixture
  • 2 small plastic cups or other containers for mixing
  • marking pen
  • watch with a second hand
  • metric ruler
  • zip-lock plastic baggie
Follow the link for the detailed instructions.  And PLEASE, if you have better luck, let me know!  

Rosemary Olive Oil Bread by "A Hint of Honey"

Rosemary Olive Oil Bread by A Hint of Honey

A Hint of Honey picture
I found this recipe on Pinterest last year.  I am not a huge fan of Rosemary flavor, I think it can be a bit overwhelming.  I just had to try it, it looked too good.  I am glad I did.  In fact, I just made another loaf of it tonight.  Although, I suppose it would be, another "round" of it tonight.  
I don't own a proper loaf pan.  So most of my breads are shaped, then baked.  I was so pleased that I only had to roll this into a ball and lay on parchment paper, in order to bake it.  

I did make a change.  I have a trace allergy to wheat, so I substituted Spelt flour for the wheat flour. Usually, spelt flour does not bother me like pure wheat flour does.  For some reason, this spelt flour did cause me to have some issues.  In the spelt flour's defense, I was already sick with bronchitis, so my immune system was not up to par.  Otherwise, I don't think I would have had any problems.  That is not the recipe's fault, just letting you know, you can substitute spelt flour for the wheat flour.  I also used the entire packet, of yeast, instead of measuring it.   My bread was light and oh so good. 

This bread, made my house smell SO good! It was wonderful.  I made it in the fall, which made walking into my house, like walking into a cashmere sweater.  Warm, inviting, and oh so comforting.  This bread is NOT overwhelming.  The taste is earthy, with just the right amount of seasoning.  You must try this bread with your next meal.  

Pinterest Pin Test Rating: Pintastic!!!

.
My first attempt at the bread


Rosemary Olive Oil Bread

INGREDIENTS
1 cup warm water (100-110 F)
1 Tbsp. organic cane sugar
2 tsp. active dry yeast
1 tsp. salt
2 Tbsp. fresh rosemary, chopped (or 2 tsp. dried)
1/4 tsp. Italian seasoning (or pinch of each ground garlic, dried oregano, and dried basil)
1/4 tsp. freshly ground black pepper
2 Tbsp. extra virgin olive oil
1 1/2 cups white whole wheat flour
1/2 cup bread flour + extra for kneading
1 egg, whisked + 1 Tbsp. water, for egg wash
dried rosemary, for sprinkling

DIRECTIONS
1. In a large bowl, combine the warm water, sugar, and yeast. Let sit 10 minutes to proof.

2. Stir in the salt, rosemary, seasonings, olive oil, and whole wheat flour. Add the bread flour and stir until the dough forms a ball. Knead on a lightly floured surface for about 5 minutes, adding more flour as necessary to prevent sticking, until smooth.

3. Place the dough in a lightly greased bowl; cover; and let rise until doubled in size, about1 hour.

4. Punch down the dough and form it into a round loaf. Place it on a cornmeal dusted pizza peel or parchment paper; cover; and let rise until doubled in size, about 45 minutes.

5. Meanwhile, preheat oven (and pizza stone) to 400 F. Once the dough has risen, gently brush the top with egg wash and sprinkle with dried rosemary.

6. Bake on preheated stone for 20-25 minutes until the top is golden brown and sounds hollow when tapped.

Makes 1 round loaf.

(Adapted from Laura A. and All Recipes)

Below is a picture of how my first loaf turned out. 


I am addicted to Pinterest, as most people I know are.  I love trying the recipes, crafts, home made cleaners, and the list goes on and on and on.......
I have tried many and thought it would be helpful to log them on a blog so others can comment or learn from my own experience.  Please feel free to comment, and submit your own experiences.
So lets get testing.......

Oh, one more thing.  The name Pinterest is not owned by me.  This blog is for fun.  I use the name Pinterest, only to identify what I am testing.  If I were testing Tweets, I would be the Twitter Tester......It's all for fun and information.  I don't make any money on this, just trying to be helpful!

NOW, let's get testing.......

Wednesday, March 27, 2013

Herb seasoning salt Tempero Mineiro

I have been wanting to try this seasoning salt since I saw it on Pinterest. This recipe, Herb Seasoning Salt or Tempero Mineiro is from Pinkbites.com. It sounded peculiar and delicious at the same time. I tend to either under salt or over salt things. Seeing how much salt is used in this recipe, I was especially concerned. However, the ingredients are all delicious so I had to try. Let me tell you all, this is delicious, smells delightful, and flavors beautifully.

[tempero 5.jpg]
www.Pinkbites.com
Pinterest Pin Test Rating: PINTASTIC!!!

Herb Seasoning Salt:

2 green peppers
3 large onions
6 whole heads of garlic
1 bunch of flat-leaf parsley
1 bunch of green onions
1 bunch of fresh bay leaves
about 2 pounds of salt
Remove seeds from green peppers, remove the internal  white membrane and roughly chop it.
Peel and quarter onions.
Peel all garlic cloves.

Place all ingredients except the salt  in the food processor and mix until smooth.

You won't be able to fit it all in once, so start by pulsing the herbs and adding the onions and garlic as space becomes available.
Pour the blended mixture into a large bowl.
Add salt and mix it with a spatula until you get a grainy consistency, this will take more or less 2 pounds of salt. I use kosher salt.
Transfer the final product to designated containers. They can be kept in the fridge or frozen for later use.
Helpful Notes:
  • Use the seasoning in soups, stews, rice, beans, meats, just about anything.
  • You will need to use very little  to season your foods, a little really goes a long way.
  • Just heat a little olive oil or vegetable oil, add the amount of seasoning desired and cook for a quick minute before proceeding with the remaining ingredients.
  • You can use this seasoning mix when a recipe calls for cooking chopped onions and garlic.
  • When using this mix on a dish, adjust the salt at the end because the seasoning is already quite salty.
You can find pre-peeled garlic sold in jars and it will make the task easier. However, I think the freshness of the ingredients on this recipe is really important, so I buy whole heads and bare the task of peeling them one by one. But then again, I just have to do it once a year, or so.


There were many comments on Pink Bites, blog post, about this recipe. Most were in a foreign language, Many were in praise and a couple were very negative. One said this recipe was a waste and ruined all the ingredients. Apparently, this person did not realize it is a salt seasoning. A little goes a long way.
I cut up chicken tenders, with the intention of making teriyaki chicken. I put olive oil and a pat or two of butter in a skillet. Time to add the herb salt. How much? Well, I remembered some good advice from my Mom, "you can always add, but you can't take out." With that in mind, I added a slightly rounded teaspoon of the seasoning salt. As it cooked, my house smelled wonderfully of aromatic veggies. I added the chicken and let it cook through. When my friend came in, I asked her to taste the chicken to see if it needed any teriyaki. I myself thought it was fantastic as it was. She agreed. No teriyaki on the chicken, perfectly seasoned, as is.
Next up to cook was, zucchini. I used the same skillet and put in 1/2 tsp of the seasoning salt. They were so good, almost a bit to salty, almost. Delicious. The teriyaki sauce went on the rice. It seemed to boring, after the delicious chicken and zucchini.
I put a whole chicken in the crockpot, and added the seasoning salt to it as well. This time, I didn't add enough. I added one tablespoon. I should have added two. Still, the chicken was very good. Would have been better with more of the seasoning.
I really like that this seasoning will last so long. It can be frozen. It took a while to peel all those cloves of garlic, but it was so worth it.
Don't worry, bay leaves are NOT poison. To think that we put them in our soups and stew, then not eat the leaves because it is poison, is ridiculous. Wouldn't the poison leech into the foods just by cooking in the juices! We don't eat them because they are bitter, and hard. Use too many bay leaves and you'll have a nasty bitter after taste in your food.


Thursday, January 17, 2013

Refrigerator Cucumber Salad


Refrigerator Cucumber Salad blog pic

Refrigerator Cucumber Salad

I found this recipe this past summer on Pinterest, Refrigerator Cucumber Salad.  I was skeptical, but I love cucumber salad.

My Mom use to make a delicious cucumber salad when I was a kid, using fresh cucumbers from our garden or from the State Line produce market.  I remember sitting at the table and eating all I could hold of that delicious salad.  I've tried to replicate it, but have not been able.  I will need to ask Mom for the recipe. That would be the easiest way, wouldn't it. <grin>

I thought I'd give this a shot.  I cut the recipe in half, just in case I didn't like it.  THAT was a mistake.  This stuff is delicious.  After I finished making it, the house smelled so good, and the taste was incredible.  I immediately went to the grocery store to buy all the ingredients, so I could make a huge batch of it.  My husband, who normally doesn't like this type of food, loved it.

We had a cook out and had several friends over.  I'm so glad I made the entire recipe, because it went very quickly.  What was left, was packed up for my best friend to take home with her.  Back to the grocery store for more ingredients. In fact, there's a container of this salad in my fridge right now!  I don't use canning jars, I use a large container with a lid.  It's eaten pretty quickly in our house.

Pinterest Pin Test Rating: Pintastic!


Refrigerator Cucumber Salad by Ann Kelly
 http://recipeswelove1.blogspot.com


4 thinly sliced cucumbers
1-large  sliced red onions
1-large  sliced green bell  peppers
1-tbsp salt
2-cup white vinegar
1 1/2-cups sugar
1-tsp celery flakes
1-tsp red pepper flakes


Mix cucumbers, onions, peppers and salt; set a side
Put vinegar, sugar, celery flakes and pepper flakes  in a pot and bring to a boil. Remove from heat and  add 2 handfuls of ice until melted.


Place all veggies in large mouth canning jars (2 quarts or 1 half gallon jar)
Pour mixture over cucumbers,  store in refrigerator.

Will keep up to 2 months

Makes 2 quart jars